
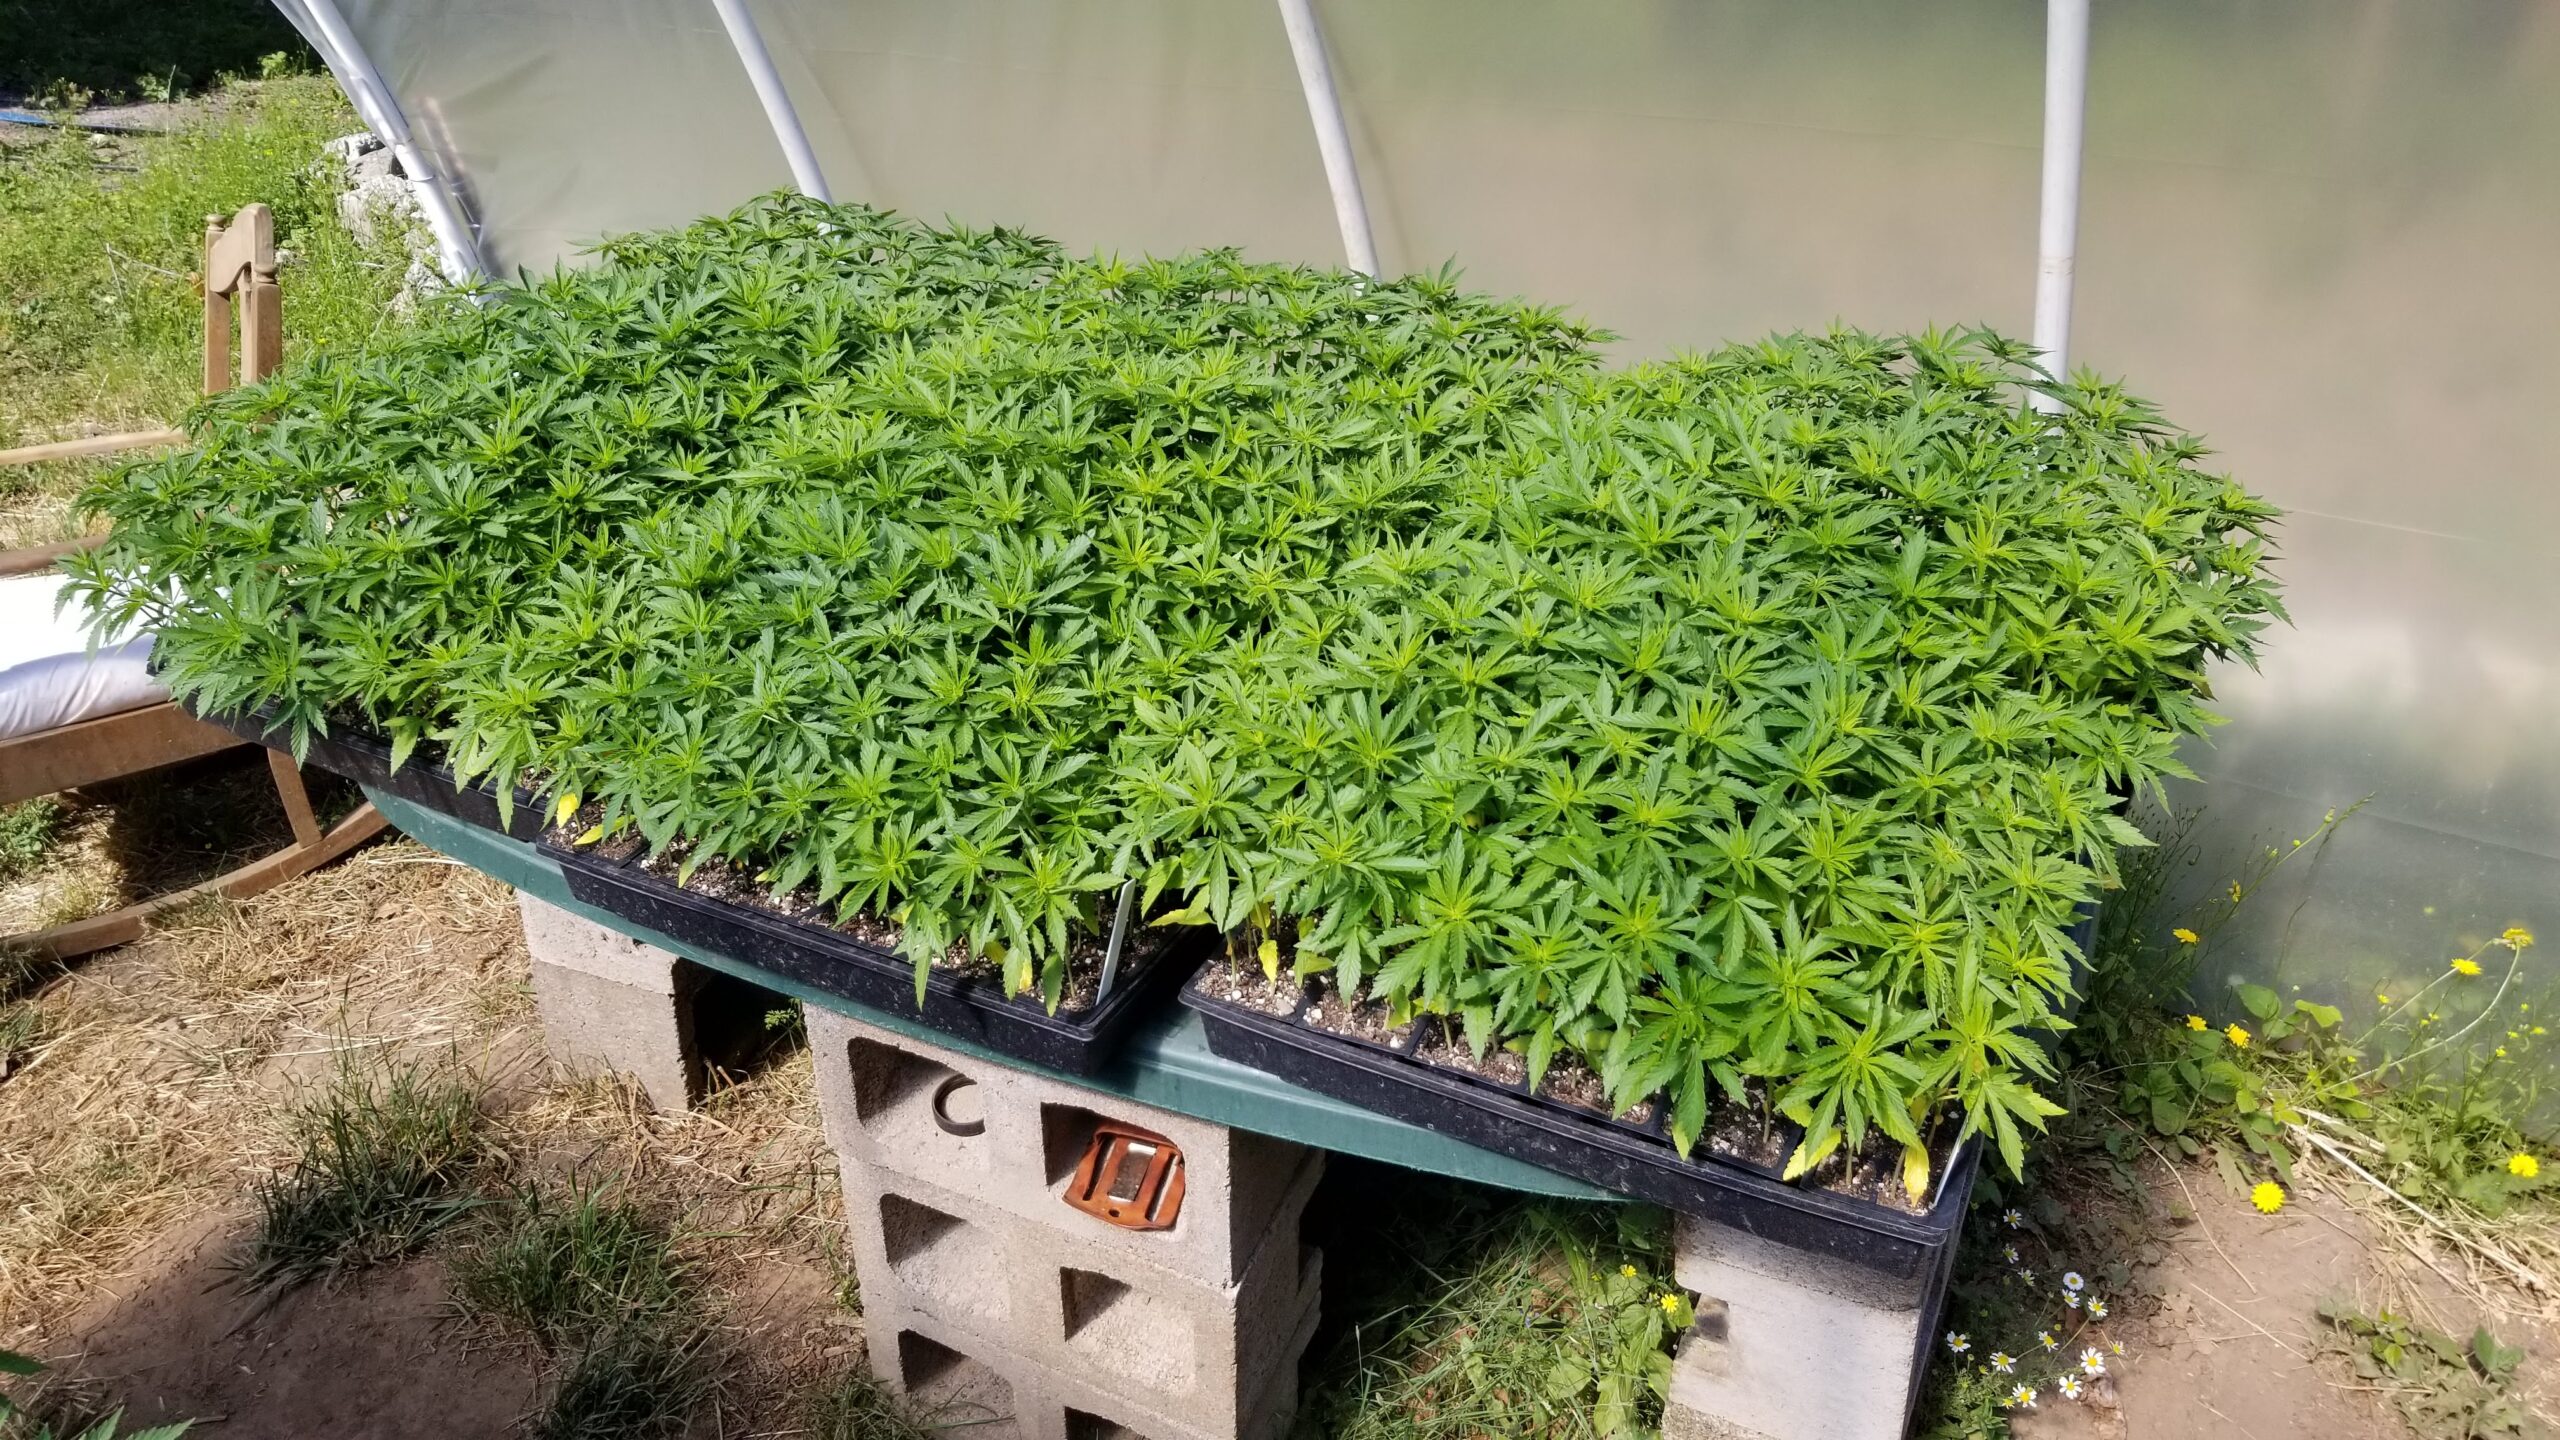
Outdoor Seed Germination: My Hoop House Method for High Germination Rates
By Bradley Danks | bdanks.com
Getting seeds to germinate consistently is the first step toward a successful outdoor growing season. Over the years, I’ve experimented with different ways to start seeds, including sowing them directly into the ground, starting them indoors under grow lights, and germinating them outdoors in a hoop house.
For me, the outdoor hoop house method has consistently delivered the best results. Under the right conditions, I typically see germination rates around 99% using this method. That’s my personal experience, not a guarantee, but it’s the approach I keep coming back to when starting seeds for the outdoor season.
As an Oregon breeder focused on early-flowering, mold-resistant genetics for the Pacific Northwest, getting seedlings started at the right time is an important part of my growing process. Here’s how I do it, what equipment I use, and a few lessons I’ve learned along the way.
Why I Prefer Germinating Seeds Outdoors in a Hoop House
My germination setup is pretty simple: a plastic-covered hoop house without doors, allowing air to move freely through the structure.
There are three main reasons I prefer this setup.
1. The extra warmth helps seeds germinate faster.
The plastic covering traps some of the sun’s heat, creating a warmer environment than the surrounding outdoors. I’ve personally noticed better germination when the weather is favorable and daytime temperatures inside the hoop house are around 75–85°F.
2. Protection from rain helps prevent overwatering.
Spring weather in Oregon can be unpredictable. Heavy rain can leave seed-starting media saturated for extended periods, especially when temperatures remain low. The hoop house keeps direct rainfall off my trays, allowing me to control watering instead of relying on the weather.
3. Fresh air can move through the structure.
I leave the ends open so air can flow through the hoop house. This helps keep air moving and reduces the risk of excessive heat and stagnant, humid conditions. The key is finding a balance between warmth, moisture, and ventilation.
I’ve tried starting seeds directly in the ground and using a similar sowing method indoors under grow lights. Both can work, but my outdoor hoop house has given me the most consistent results.
When I Start My Seeds in Oregon
I’m growing at approximately the 45th parallel in the Pacific Northwest, where spring weather can swing between warm sunshine and cold rain.
My usual schedule is to start seeds outdoors around June 1 and transplant around July 10. That gives the seedlings approximately five weeks to establish themselves before going into the ground.
I’ve started as early as May 1, but early sowing seems to work best when the forecast calls for sunny, warm weather. When it’s cold and rainy, germination can slow down, and I’ve noticed lower germination rates.
I pay close attention to the weather rather than following the calendar blindly.
My preferred daytime hoop house temperature during germination is 75–85°F. Because a covered structure can heat up quickly, I also monitor temperatures and provide adequate ventilation. On unusually warm days, the inside of a hoop house can get considerably hotter than the outside air.
The goal is to provide consistent warmth without overheating the seedlings or allowing the growing medium to dry out.
My Seed-Starting Trays and Growing Medium
One thing I’ve learned is that the size of the cells matters. I prefer larger seed-starting cells because seedlings have more room for their roots to develop and the growing medium doesn’t dry out as quickly as it does in small cells.
Here is the equipment I use:
1. Extra-large six-cell seed-starting trays
I use six-cell inserts with these dimensions:
- Individual cells: approximately 2½ inches wide × 2¼ inches long × 3 inches deep
- Each six-cell insert: approximately 7 × 5 × 3 inches
- Each larger plant-growing tray: 36 cells in total
I typically dedicate one six-cell insert to each strain and place a label in the corner so I can identify the entire group.
These larger cells help prevent seedlings from becoming rootbound too quickly and give me more flexibility if I need to leave them in their trays a little longer before transplanting.
This post contains affiliate links. I may earn a commission from qualifying purchases at no extra cost to you. Thank you for using the links, it helps me keep the lights on so I can keep creating helpful content like this for growers 🙂
The six-cell inserts I use: Shop seed-starting cells on Amazon

2. Plant-growing trays with drainage holes
I place the individual six-cell inserts inside larger plant-growing trays with drainage holes. This keeps everything organized while allowing excess water to drain onto the ground rather than collecting underneath the cells.
Good drainage is important because consistently saturated media can deprive roots of oxygen and create conditions that encourage seedling problems.
Shop plant-growing trays with drainage holes on Amazon
3. Choosing between potting soil and coco coir
I’ve used potting soil for years, and I’ve also had good results with coco coir. Both can work well, but they have different advantages.
Option A: Nutrient-rich potting soil
My preferred potting soil is FoxFarm Ocean Forest. I like using a nutrient-rich mix because it provides nutrients that help support early plant growth. The plants noticeably grow faster with it rather than their other soil, Happy Frog.
The main advantage is convenience. You don’t have to build a complete nutrient program from scratch, although you still need to monitor the plants and avoid overfeeding or overwatering.
The downside is that soil can be less forgiving if it stays too wet and causes the seedlings to get overwatered and stunt their growth.

Option B: Coco coir
My other option is bagged coco coir without added perlite.
In my experience, coco is less prone to the overwatering problems I encounter with soil, provided the watering and drainage are managed properly. I’ve also had fewer issues with pests such as fungus gnats and thrips when using coco, although coco doesn’t eliminate pest problems.
The trade-off is nutrition. Coco generally requires a complete nutrient program rather than relying on the nutrients already present in a rich potting mix.
If you’re comfortable mixing your own nutrients, coco is worth considering. If you prefer a simpler setup, potting soil is a good place to start.
I’ve used both mediums successfully. I wouldn’t say one is universally better than the other; the best choice depends on your watering habits, nutrient program, and experience level.

Preparing the Cells and Sowing the Seeds
Once I’ve chosen my growing medium, the process is straightforward.
Step 1: Fill the cells.
Fill the seed-starting cells with your chosen potting soil or coco coir. The medium should be evenly moist and loose enough for emerging roots to grow through it.
Step 2: Make a small planting hole.
I use my finger to make a hole approximately half an inch deep in each cell.
Step 3: Add the seeds.
Place a seed in each prepared hole.
Step 4: Cover the seeds.
Lightly cover each seed with the surrounding media or dust a layer of media over the top of the cells. Avoid packing the medium down too tightly.
Step 5: Water the cells.
Water the medium in gently so the seeds do not get disturbed. I use a diluted nutrient solution as part of my normal routine.
Step 6: Label everything.
Don’t skip this step! I usually start one strain per six-cell insert and place a plant label in the corner. When you’re starting lots of different genetics, good labeling prevents mix-ups later.
My Seedling Nutrient Program
I approach soil and coco differently when it comes to feeding.
Feeding in potting soil
When I use soil, I typically feed with fish emulsion and Cal-Mag as part of my routine or ill use my custom salt fertilizer mix. Either option works fine it just depends what you feel comfortable with.
My usual starting rates have been:
- Fish emulsion: 1 tablespoon per gallon of water.
- Cal-Mag: 1 teaspoon per gallon of water.
Those are the rates I’ve used with the suggested products linked below, not universal recommendations for every product or growing medium. I typically feed every watering without issues, that’s right, every single watering I feed. You can water with pure water first and then come back through and make sure every seedling gets a splash of nutrients at every watering. Or if you mix salts, mix up a 50 gallon drum and use a sump pump, hose, and watering wand to water with solely diluted nutrients every watering. In the past I have used bottled nutrients and salts successfully with a low dose like 500-900 ppm’s on the 700x scale for the seedlings without issues.
Feeding in coco coir
When I grow in coco, I mix my own nutrient salts, including potash, Epsom salts, calcium nitrate, monopotassium phosphate (MKP), and a micronutrient blend.
Building a balanced nutrient solution from individual salts takes more knowledge and attention than using a ready-made product. You need to account for nutrient ratios, concentration, water quality, and compatibility.
If you already know how to mix a complete nutrient program, coco can be a great option. If you don’t, I’d recommend starting with a complete nutrient system designed for coco rather than trying to guess the correct proportions.
Athena is one example of a commercial nutrient system worth researching. And just like with feeding in potting soil ive used bottled nutrients and salts successfully with a low dose like 500-900 ppm’s on the 700x scale for the seedlings without issues.
Shop Athena nutrients on Amazon
I’ll cover my custom nutrient recipes and mixing process in a separate blog post because there’s a lot more to it than I can reasonably fit into a seed-germination article.

How Long Does Germination Take?
Under favorable conditions, I typically begin seeing seeds emerge from the growing medium within two to three days.
Actual germination times vary depending on seed quality, seed age, temperature, moisture, and other environmental factors. Some seeds emerge sooner, while others take longer.
I don’t assume that every seed that hasn’t emerged after a couple of days has failed. Giving seeds appropriate conditions and enough time is important.
With my outdoor hoop house method, I’ve personally achieved germination rates around 99% when conditions are favorable. However, no germination method can guarantee that every seed will sprout.
Over the years, I’ve had occasional problems with mice eating seeds and stretches of cold, rainy weather that slowed germination. Those experiences are a good reminder that even a reliable setup can have setbacks.
Preventing Thrips and Other Seedling Pests
Germination isn’t the only thing I watch during the first five weeks. Pest management is another important part of raising healthy seedlings.
Thrips have been a recurring issue in my seed-starting setup. Although established plants can sometimes tolerate feeding damage, young seedlings have much less room for error.
I inspect the plants regularly and look for signs of pest activity so I can respond before a small problem gets out of hand.
When I need to treat thrips, I’ve used Monterey Garden Insect Spray during vegetative growth. I generally only need one or two applications during the seedling stage when the treatment is effective. I apply it around week two and week four of the germination process. I never spray it during the flowering cycle.
Shop Monterey Garden Insect Spray on Amazon
Application Rate:
- Monterey Garden Insect Spray: 2 ounces per gallon of water.
I use a one-gallon pump sprayer for applications.
Shop a one-gallon pump sprayer on Amazon
Regular inspections, good airflow, and a clean growing area can help reduce pest pressure before it becomes a bigger problem.
When I Transplant the Seedlings Outdoors
I typically grow my seedlings for about five weeks before transplanting them into the ground.
That gives them time to develop a stronger root system and become more established than they would be immediately after emergence.
I don’t rely on age alone, though. Seedlings develop at different rates, and their readiness for transplanting depends on their overall health, root development, and growing conditions.
Before moving them outside, I make sure the planting location and weather are suitable. Since there are no doors in my hoophouse the wind can freely blow through and strengthen up the seedlings in preparation for planting outdoors. I don’t use any shade cloth in the hoophouse so that way the seedlings will be completely hardened off and ready to go come transplant day.
My usual schedule of starting around June 1 and transplanting around July 10 is based on my experience growing at the 45th parallel in Oregon. Your ideal timing may be different depending on your latitude, local climate, and the varieties you’re growing.

Why I Keep Coming Back to This Method
I’ve experimented with germinating seeds indoors and outdoors, and both approaches have their place. Indoor germination can work very well, but I’ve personally experienced a higher failure rate with my indoor setup than with my outdoor hoop house.
For my operation, the combination of extra warmth, protection from rainfall, ventilation, and larger seed-starting cells has made this my preferred approach.
I also appreciate being able to start a large number of seeds in organized batches, with each strain clearly labeled and ready for the next stage of the growing process.
For breeders and outdoor growers, getting seedlings established reliably can make a big difference in how smoothly the rest of the season goes. A little planning at the beginning can save time and frustration later.
At Bradley Danks, my breeding work focuses on developing early-flowering genetics with improved resistance to bud rot for the cool, rainy conditions of the Pacific Northwest. Starting healthy seedlings is one part of that larger process.
Need Help With Your Growing Setup?
Every growing environment is different, and sometimes it helps to have someone look at your specific situation.
If you’d like one-on-one help discussing your growing setup, genetics, or outdoor growing plans, you can book a one-hour consultation with me for $100.
Book a one-hour consultation with Bradley Danks
Thanks for reading, and good luck with your outdoor season!
— Bradley Danks
Visit bdanks.com to learn more about my breeding work and genetics.
As an Amazon Associate I earn from qualifying purchases. Thank you for your contribution!